10 points to consider when integrating Stripe Connect with Custom accounts for a global marketplace
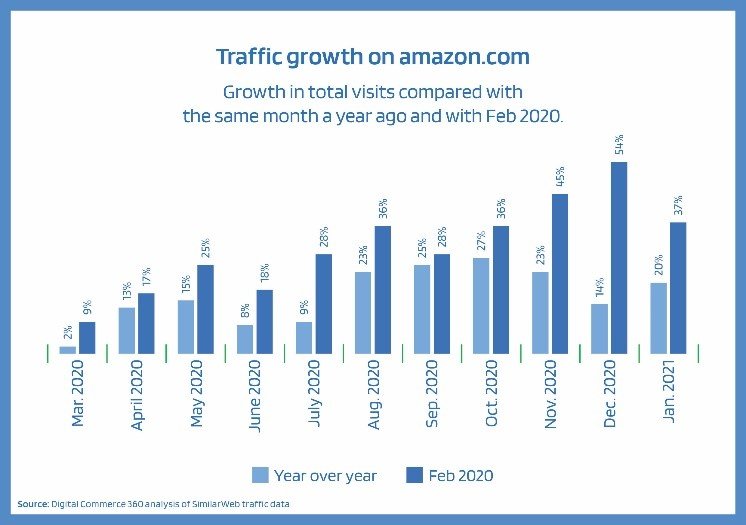
Despite faulty predictions for the global economy in these challenging times of the unprecedented pandemic of COVID-19, e-commerce businesses and (online) payment providers are thriving. An important part with a significant growth rate is marketplaces. For instance, Amazon’s marketplace increased its traffic by up to 37% in February compared to the year before.


If you plan to run a platform or a marketplace utilizing a payment model of many to many, you have probably wondered which would be the most suitable payment partner to support your business. However, most prominent players on the market either do not support this model or find it challenging to meet the clients’ requirements and considerations (especially for a local or a smaller marketplace):
- A minimum processing volume in the millions per year;
- Potentially huge integration effort on both sides – for the platform and the payment provider;
- Complex requirements regarding licensing (Payment Institution License, a banking license, PCI DSS level 1, regulation etc.).
We would be happy to advise you personally to find the right payment provider for you.

One of the payment providers you can rely on is Stripe. They offer a comprehensive payment solution that fits most needs out there: from the ease of integration, through their API friendly approach, ease of onboarding as a platform and as your merchant, to a wide variety of standard and local payment methods, global reach, and fast and reliable support.
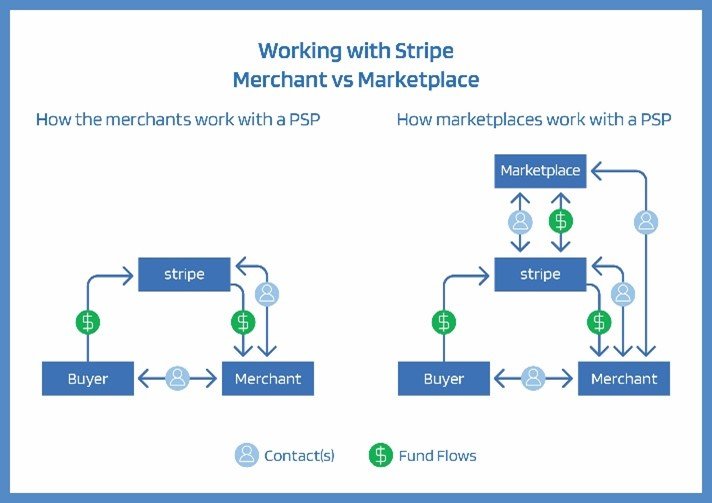
As good as Stripe is as a partner, there are some crucial points you need to consider minimizing refactoring time, unexpected behavior, errors, and potential long-term issues. In this article, I will cover the module Stripe Connect with Custom accounts. Still, it provides a seamless solution that offers everything you will need to process payments on behalf of your merchants, while Stripe stays “hidden” for buyers and merchants.

1. Global reach
Stripe Connect with Custom accounts is available for platforms and marketplaces in well over 30 countries. Most major countries are already covered, and Stripe is continuously extending the list.
For a global platform, a global reach is of utter importance. The ability to facilitate payments for both US and non-US merchants is often a barrier that divides success from mediocrity. On paper, it sounds as Stripe will solve all those problems with ease. And in most cases, they do. However, there are some small but deciding details one must consider.
First and foremost, you must verify if your Platform could be registered in one of the lists of supported countries from Stripe. The list extends to most major markets and a majority of the EU, so Stripe has you covered. Merchant country of origin or registration is more flexible, and the major differences are towards the requirements for minimum data for the onboarding.
Important to note is, in case your Platform is registered in the EU, there are some types of cross-border money movements that are restricted or unavailable.
2. Onboarding of US merchants
As a platform registered in the EU, Onboarding and maintaining US merchants can be tricky. While the US is not locked for you in its entirety, some cross-border transactions can be restricted or simply unavailable. Similarly, you will also face some restrictions if your US account wants to onboard merchants from outside the US. Therefore, it is best to onboard your US merchants a US account and your EU merchants to their own EU account.
3. Cross-border transactions
This point is not as straightforward as it might look at first glance. Stripe allows cross-border payments without any hassle (and much more accessible and convenient than any other payment provider). You can easily set up your EU merchants on your US platform if they successfully pass the onboarding process. The unapparent issues might only become evident in your final setup. For example, you might need to use a transfer functionality, which is not connected to any card payment (e.g., to regularly send money to a merchant as a bonus on top of a transaction). Suppose you are using destination charges and have chosen the on_behalf_of parameter, thus setting the connected account as the merchant of record. While this does not change the flow of funds, nor the number of API calls required, you are now allowing Stripe to takeover processing. Fee management, meaning recouping the fees Stripe takes from your platform account through an application fee from your merchants, however, stays with you.
Of course, you can set your platform fee. However, this setup is only possible with a Full-service agreement (which the merchant must accept during the onboarding and account creation) – which renders any transfer to fail. Of course, there are many workarounds, such as allowing user creation under the Recipient Service Agreement. However, this will come with some drawbacks – you cannot use the on_behalf_of parameter, which results in the transfer from the platform account to the connected merchant account to be executed by the platform. Additionally, you must define the fees yourself.
We recommend avoiding these inefficient workarounds, by making sure that you onboard connected accounts with the full set of capabilities that will be required to support the given funds flow – in this case, destination charges with on_behalf_of.
4. Currency conversion
With Stripe Connect and Custom accounts, one of the most critical topics is the main currency of your account. Presumably, it will be USD in the US and EUR in the EU. You should carefully decide the currency in which your customers will be paying at checkout. Moreover, it will be the currency in which their payment method will be charged and received on your platform account or, depending on the setup you chose, directly on the merchant account. Here, it is important to note that the merchant’s registered bank account determines the currency for the payouts. If there is any change in the currency on any of the steps (checkout – platform account – merchant account), the payment will go automatically through Stripe’s FX. For instance, if the payment flow setup is customer (GBP) – platform (USD) – merchant (EUR), you should anticipate the payment going through 3 different currency conversions, creating additional costs for you and your merchants. Though more complex, one possible solution for this is to set up multiple platform accounts, which will manage their respective merchants per geographical region and currency setup (e.g., customer (USD) – platform (USD) – merchant (USD) and customer (EUR) – platform (EUR) – merchant (EUR)).
5. Detailed reporting
Through Stripe’s dashboard, you can anticipate some reporting which can suit your needs. The basic reporting is generally limited. It takes time for the report to catch up to the latest day, it lacks certain flexibility if you want to go into detailed reconciliation, and it might easily confuse you with different balances handling, currency conversions, and multi-currency transfers. Of course, you can consider opting in for Sigma custom reports. However, Sigma is an additional paid service (with a 30-days free trial) that provides an interactive SQL environment directly onto your Stripe dashboard. If you like an industry-standard, flexible, and customizable reporting experience, still the best option would be to interact and combine the reporting of your system data with Stripe’s.
6. Checkout styling
7. Error handling
Stripe offers decent error handling, and you can have those associated error messages propagated through webhooks. An important note here is how you deliver those errors related to payments. As Stripe Connect with Custom accounts hides Stripe from your customers, you will need to specify which errors and in what format they are shown to the customer at checkout. You need to consider this both from a pure anti-fraud and anti-money laundering perspective, but also from the side that neither the customer nor the merchant will be aware at this moment that Stripe is behind the payment processing. While Stripe allows you to set custom descriptors for payouts, Stripe might still appear on your merchants’ and their customers’ bank statements. Nevertheless, it is best that you either rework or reconsider how you display errors from a professional standpoint.
8. KYC and Merchant onboarding
The way Stripe handles KYC and AML is straightforward. Stripe allows your connected accounts to receive money with low-risk platforms even before completing the entire KYC process, which is excellent in terms of client experience. Additionally, you can follow their guidelines for the minimum required data to allow payments received upon a certain threshold before providing the following data set required or allowing the merchant to payout. It is necessary to consider the verification process itself: Will you request all data and documents at once, potentially off-putting some merchants, or will you have different request stages, lengthening the procedure and making it a bit more complicated for your customers. Moreover, you might want to implement a specific API, allowing the transfer of additional documents when required and corresponding webhooks to receive updates when a particular copy is needed.
9. Platform top-ups
Due to refunds, disputes, FX fees, and other potential costs, merchants might develop a negative balance in their connected account. To remedy this, platforms in some geographies can add funds to a separate balance specifically for covering connected account costs.
Specifically, Stripe offers several ways to do so: You can implement ACH credit transfers (US accounts) or use standard wire transfers (EU accounts). For ACH credit transfers, you should consider how you create the source (e.g., one-time payment, reusable, and rechargeable). If it is not reusable and rechargeable and you send money to it, the transaction will fail. The same usually goes for sending money from an EU bank account to a US ACH bank account. Additionally, for EU transfers, please make sure you are using the correct transfer type if it is a top-up or covering for negative balances and the general usage of the money.
10. Payout management
Payouts to your merchants can be done manually or automatically with any given timeframe enabled by Stripe. If you do not want to track all payouts, you can set it up to automatic (with a rolling base). However, you should be aware that whatever balance is on the merchant account will be fully paid out. This, in turn, will prevent you from setting any minimum payout limits. For such, you might want to set it up to manual, which will mean that you either have to execute it from Stripe’s dashboard or run manual API calls and follow up on your merchants’ balances (which can be inconvenient).
In conclusion, Stripe Connect with Custom accounts provides excellent flexibility for any platform and marketplace, facilitating payments for your merchants while keeping Stripe as a payment partner working in the background with little to no exposure for your users. It provides a 360-degree solution for all your payment management needs – from merchant onboarding through a PCI DSS certified widget, many-to-many payments model, fee management, and payouts. Nevertheless, certain details, such as those mentioned above, must be considered to save you plenty of time, effort, and money.

About the author
With more than 12 years of experience in the payments and fraud management domain, Valentin is Senior Product Specialist Payments at aye4fin. He worked in operations and product roles for some of the world’s biggest payment and gateway providers and built and managed the payment processes for several merchants.
On this note, we are proud to announce that aye4fin has recently become an official Stripe partner. As Stripe’s first German implementation and consulting partner, we look forward to working with one of the most renowned and financially strongest FinTech in the world.
More on our services and how we can support you with your Stripe implementation in the Stripe partner directory or contact us here!
integrating